Feeds:
Posts
Comments

Posts Tagged ‘red wiggler’

I’m not sure if I could keep a basement full of trash. But this video really makes you think about how much trash we each contribute to the landfills. It also highlights how worms can be used to cut down on our paper and food wastes. Thanks Dave and ABC news for sharing this experiment with the rest of us.

If you’d like to purchase the Worm Factory composting system viewed in this video, please visit our store.

Read Full Post »

Question:

The instructions indicate that we can give them a ½ pound of food a day, but we have found that to be way too much.  In fact, we’ve only fed them a few times and they are still working through that food.  Can you help us out here?

Answer:

It will take a few weeks for the ecosystem within your bin to become established. There are a lot of little bin critters who assist the worms in breaking down the food. In some cases the critters eat the food and the worms eat the critters. It is always best to feed sparingly for the first 4 weeks while things get up and running.

Another thing to consider is the state of decomposition of your feedings. All foods must mellow or bloom before the worms can consume them. Items like melons, pineapples and pumpkins take very little time (3 days or so) to mellow enough for the worms to consume. Other foods, like potato skins, carrots, cabbages etc. could take months to bloom without your help. And, in fact, may root and grow in the bin.

For carrots and potatoes, we find the best solution is to throw them into the slow cooker for an afternoon to soften them up before adding to the bin. In the case of cabbage, we cut it up and place it in the freezer until hard, then thaw in a sink of warm water before adding.

Never add foods that have salt, pepper, butter or sauces on them. These will kill your ecosystem and the bin will take several weeks to get going again.

NOTE: If you ever make an error and find yourself killing off your worms and/or ecosystem (which can happen if the food heats up too much during decomposition – a common problem when too much starchy foods, like rice, are added at one time). Do not throw your entire bin contents away. Simply scoop out the bad feeding. Then feed very sparingly for a few weeks and your bin should regenerate as the worm eggs hatch.

Read Full Post »

Seedy SaturdaySeedy Saturday is a National program that’s organized every spring by Seeds of Diversity. The goal is to encourage the exchange of heritage seeds and to share information relating to organic agriculture. To find dates and event details for your area, click here.

Today’s event in Ottawa was a great success. The weather was balmy and the Ron Kolbus Centre was packed from 10:00 am to 3:00 pm.

I set up a table to promote worm composting and brought along some coconut coir and finished worm compost to sell. Our table had a steady stream of visitors of all ages with lots of questions about worms and worm composting. Our big bucket of red wigglers was a great attention grabber! It appears that the idea of vermicomposting is especially hot this year. And I’m very excited about that.

I’d like to extend a big old Howdy-do to any of you who stopped by my table. I’ll be using many of your questions to guide the next few posts.

Read Full Post »

The path to our back yard composter.

The path to our back yard composter.

The path towards indoor vermicomposting was a natural one for me.  I love finding ways to expend the least amount of effort to accomplish the greatest number of tasks.

I used to loath the trip to the backyard composter throughout the winter. I’d stow my compostables in heaps and counter top buckets for several days just to avoid making the trip. It usually took more than one scurry to get it all out when I finally needed counter space or when the smell kicked me into action.

It was during one of these awful drudges, when the snow was up to my waist, that I decided to attempt vermicomposting.

Rough Start

Getting started wasn’t easy. The first hurdle was acquiring suitable worms.  I initially opted for red wigglers over  european nightcrawlers because I wanted them to multiply quickly and I was more partial to their slender appearance.  There were no worm farms in the Ottawa area and none of the mail order worm companies could ship them in the cold.  I had to wait until spring to get my seed stock of reds.

When I finally got started I was already getting into my yard work and my yearly search for organic materials (leaf litter, newspaper, manure etc) to add to my garden beds.  After waiting so long to acquire my worms, I was naturally disappointed to learn that I’d have to wait yet another 3 months before harvesting vermicompost from my new bin. If I hadn’t been so determined to give it a try, I may have just given up.  But I’m really glad I stuck to it.

Convenience was my main motivation for starting a vermicomposter. But many rewards have followed.

A Unique Pet

The first reward being the worms themselves. I was surprised to find myself checking them often to see what foods they liked and where they were hanging out. My husband would notice me checking them and he’d come check them too. I’m sure that sounds strange to some.  But we hadn’t expected the worms to be so intriguing.

A few months after we got the worms I grew some sprouts in the bin to make it more esthetically pleasing. I was walking by my sprouts one day and I must have disturbed the worms because the sprouts started shifting about. It was hilarious! For a long time after that we continued to grow sprouts in the bin just so the kids could have fun tapping the sides and watching the sprouts move.

Gardener’s Delight

Now that I have several pounds of worms composting throughout the year,  I have plenty of worm castings to spare each spring.  This alone has saved me more money than the initial costs of getting started. I don’t buy artifical fertilizers and my plants are much healthier than my past crops.  Due to the high content of available nutrients in worm castings, my plants are also able to fend off pests and tolerate diseases without assistance. I’ve never had so many tomatoes per plant as I do now. I’ve been using sheep manure for years. But nothing tops vermicompost.

Friends Forever

The worms have paid us back in many ways. I will always have at least one worm bin in my home. It was definately worth the wait.

Read Full Post »

Earthworms of Canada

There are 23 known species of earthworms in Canada. Nearly all of them are thought to have been introduced following the ice age. Scientists believe that the glaciers wiped out every native Canadian earthworm species. But is it possible that some survived?

This is one question that Dr. Jill Clapperton hopes to answer through a five year earthworm census called Worm Watch. This program combines the efforts of public citizens, farmers, school children and scientists in a nationwide survey of species found using standardized investigative methods.  All participants are welcome!

To aid in this survey, the Worm Watch team has made species identification resources available through the web.

If you’d like to identify a specific worm species you can compare characteristics using the General Earthworm Diagram and cross reference your observations with the Taxonomic Key. Visit the Field Guide to Earthworms to confirm your identification and to gain further information about each species.

Or you can simply compare your worm specimen to photos of known species.

Unidentified Canadian Worms

If you find a worm that you can’t identify using these charts and photos, you may wish to send it to Dr. Clapperton for further investigation. So far the Worm Watch program has lead to the discovery of three new species of earthworms in Canada! There are worms in Vancouver Island, Alberta and northern Ontario that have not been found anywhere else in the world. This leaves the door wide open to the possibility that some native Canadian species may have survived the ice age.

Giant Gipsland Earthworms

Ever wonder how large earthworms can be?  David Attenborough was amazed by the enormity of these Gipsland earthworms, which could clearly be heard sloshing through the soil as he walked above their tunnels. Currently, these are the largest earthworms ever found.

Read Full Post »

A worm bin is a complex ecosystem with many micro organisms that help to break down decaying matter. In fact, without a healthy assortment of worm bin critters your worm composting system would not be functional. The majority of these critters will stay in the bin where conditions are most favorable to them.   The fruit fly is an exception to this rule. But even fruit flies can be managed. We’ll discuss some management techniques later in this post.

First lets get acquainted.

Mites
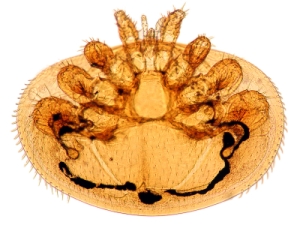
Mite

Mite

Spider Mite

Spider Mite

Mites are related to spiders and have 8 legs. They range in color from browns, reds, yellows and whites. Mites are very beneficial to your worm bin and are often the first critters to start breaking down the food.

Springtails


Springtails In My Worm Bin

Springtails

Springtails are usually white but can be gray or brownish in color. They move about by crawling or jumping. To jump they use their tails which are normally curled in close to their tummies. As they push forward from the tail they spring up. They do not have wings and will not stray out of your bin. You’ve probably noticed springtails on soil surfaces around your potted house plants.  They appear when conditions are moist and when there is decaying material to consume.  But don’t worry. They won’t eat live plant matter and are therefore completely harmless. They’re also so tiny that you’ll hardly even notice that they’re there.

Sow Bugs or Pill Bugs

Sow BugsThis photo approximates the actual size of sow bugs or pill bugs (also called the woodlouse). Sow bugs are occasionally introduced to indoor worm bins on egg ridden leaves which are brought in from outdoors.  They are quite beneficial to the worm bin, however, due to their size, they’re generally not appreciated. To avoid sow bugs in indoor bins, we recommend that you don’t add leaves and other debris from outdoors.

Centipedes

Centipede

Centipede

Centipedes, like sow bugs, are usually introduced to indoor worm bins through the addition of outdoor leaves. They are very rare in indoor worm bins, but they do occasionally appear. If you see one or two centipedes you should carefully remove them. These guys do eat worms. They occasionally bite people too, though they’re not generally poisonous to humans. It’s best to be cautious when removing them.  To avoid introducing centipedes, avoid adding leaf litter to indoor bins.

NOTE: Leaf litter is, however, a great addition to outdoor worm bins and/or composters. Red Wiggler worms are especially fond of leaves and by adding leaf litter to the surface of your yard and garden, you can attract large numbers of earthworms to these areas.

Fruit Flies
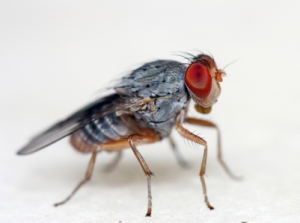
Fruit Fly

Fruit Fly

The fruit fly is the certifiable pest of all compost systems. Fruit fly eggs are present on virtually all fruit skins before you even bring your produce home. They will hatch in your fruit bowl, in your counter top compost bucket and, yes, they will hatch in your worm bin too. The best way to avoid fruit flies is to wash, cook, or blend the compost before it is added. Some sources suggest freezing to control fruit flies but that does not work. The fruit flies will simply hatch as you thaw out your produce. If you’re not inclined to cook, blend or wash everything that goes into the bin, you may also bury the food scraps deep enough that the hatching fruit flies can’t escape. A nice thick layer (3 inches or so) of shredded paper over the surface of the worm bedding will help. As will the addition of some old carpet or burlap.

For the few vagrants that do escape you may wish to have a fruit fly trap strategically placed either inside or next to your bin. There are a variety of fruit fly traps on the market, like the reusable phony apple version called the Trapple. Or you can easily make your own.

To make your own fruit fly trap, place some attractant liquid (we suggest pineapple juice) in a bottle with one drop of liquid detergent (to disrupt the liquid surface layer). Then place a funnel with a tiny hole through the bottle opening. The tiny hole will enable the flies to enter but the funnel will make it impossible for them to leave. A quick and easy funnel can be made by cutting the corner out of a ziplock bag and stuffing that corner into the bottle opening. Voila!

If you have any questions or experiences to share regarding critters in your bin, please feel free to post them here.

copyright 2009 Jennifer Englert. All rights reserved.

Read Full Post »