Step 1 – Choosing the Site
The optimum temperature range for Red Wiggler worms is 18 – 25 degrees celsius. They make great house guests! Low traffic areas are best (since worms don’t like rumbling sounds). If you don’t plan to use a lid, you’ll need a light on at all times to keep them in their bedding.
Step 2 – Making A Worm Farm & Bedding

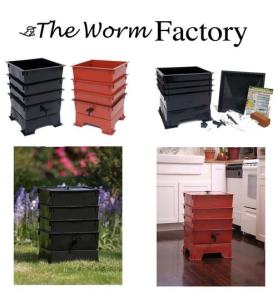
Worm Factory Bins
There are many great worm bins on the market (like the Worm Factory, Can-O-Worms or the Worm Chalet) or you can build one yourself. An old plastic container box will do. Some sites suggest that you add holes in container lids for ventilation and some in the bottom for drainage. It’s not necessary to use a lid for Red Wiggler worms as long as you leave a light on for them. Worms are photosensitive and will stay down in their bedding to avoid the light. As you become familiar with optimum moisture levels you may also use a solid bottom with relative ease.
Good bedding materials include coconut coir, peat moss, shredded cardboard boxes and shredded newspaper. Leaves, manure, straw and dirt are also great additions to outdoor worm beds. However, we suggest avoiding these materials for indoor worm compost bins as they may introduce sow bugs and centipedes to your bedding.
Set aside some shredded paper or cardboard for the top layer. Soak all the remaining bedding until it’s moist but not soggy. Squeezing the bedding in your fist should produce only a small stream of drainage. Then fluff the bedding into your bin.
Now for the fun part. Add your worms to the top of moist materials and let them slowly work their way under the surface. Place an extra layer (about an inch or two) of shredder paper or cardboard over the bedding and worms. This last layer will help to keep the moisture in and the fruit flies out of your worm bed.
Step 3 – Feeding Your Worms
All of the bedding materials that were discussed in Step 2 will serve as worm food for your herd. Over the next 2-3 months your worms will eat this bedding and turn it into fine castings. But bedding alone would make a terrible diet for your brood. To give them a balanced diet, you’ll need to add lots of food wastes including; vegetables, fruits, tea bags, coffee grounds, finely crushed egg shells and limited amounts of starchy foods like pasta, rice, potatoes and breads.
NOTE: Avoid feeding citrus fruits, onions, garlic, sauces, oils, dairy products, eggs, fish and meats.
Bury small amounts of food (up to half of the weight of your worms) into the worm bedding and wait until its mostly consumed before adding more. By rotating your feeding zones, or placing successive feeds close to but not on top of previous feeding spots, you can encourage your worms to migrate around the bin, working through all of the bedding.
Given optimum conditions your worms will be fruitful and multiply! You may notice them working through their feedings faster and faster as the months go by. Some worm species reproduce at alarming rates! Estimates place the doubling time for Red Wiggler worms between 2 to 4 months. Your feedings should naturally increase in size or frequency to compensate for their growing needs.
Always cover your table scraps with your shredded paper layer of bedding to form a barrier that the fruit flies can’t cross. Add additional paper as needed to maintain sufficient thickness.
Step 4 – Harvesting Your Compost
Within 2-3 months of setting up your bin, you’ll notice that most of the original bedding will be consumed and turned into nice dark worm castings. Worm castings are great for your gardens and house plants, but they’re not so great for your worms. If you do nothing with this bedding, the worms will slowly begin to die. Now is the time to harvest your worms.
If you’ve purchased one of the stacking tray systems that were mentioned in Step 1, then this is when you’d add the next tray with new bedding. Your worms will slowly work their way up to the new bedding materials in the upper tray. You may then remove the finished compost from the bottom tray as needed.
If you don’t have a self harvesting system, there are many different harvesting methods to choose from. I will cover these with pictures and videos in future posts. But for now we’ll look at one of the easiest approaches to harvesting worms – the horizontal method.
Gently pile the worms and finished compost to one side of your bin. Add new bedding and food scraps to the other side. If you never place food into the old bedding, the worms will gradually migrate to the side with the new bedding. This can take several weeks. You may have noticed, by now, that worms don’t tend to rush things. They’ll get to the other side in their own due time.
For more efficient methods of harvesting please stay tuned. Your feedback and questions are always welcome.